
Description:-
In this article we are going to see how to connect SQL Developer to a database in Oracle Autonomous Data Warehouse, and then create tables.
Steps to create Oracle Autonomous Data Warehouse Database here
Step1:-First, define a SQL Developer connection as the user admin to a database in your Autonomous Data Warehouse.
Step2:-Open SQL Developer on your local computer. In the Connections panel, right-click Connections and select New Connection.
Note:
Do not right-click Database Schema Service Connections. That menu selection is for connecting to a different Oracle cloud service, the Oracle Database Schema Service
Step3:-The New/Select Database Connection dialog appears.
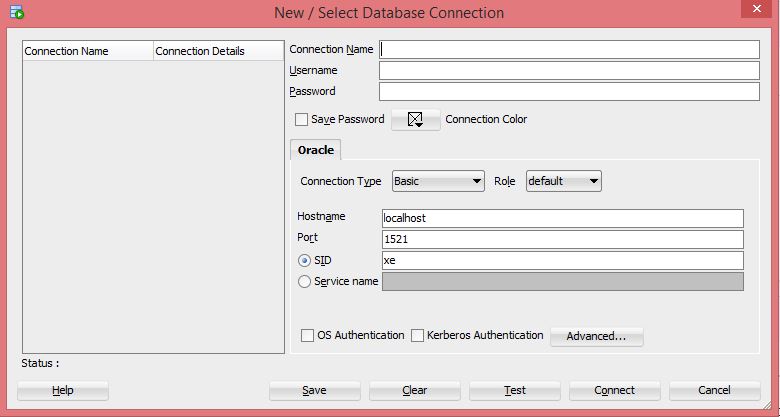
Step4:-Enter the following information
Connection Name – Enter the name for this cloud connection.
Username – Enter the database username . Use the admin database account that you created in the previous tutorial.
Password – Enter the password that you specified when creating the adwc_user
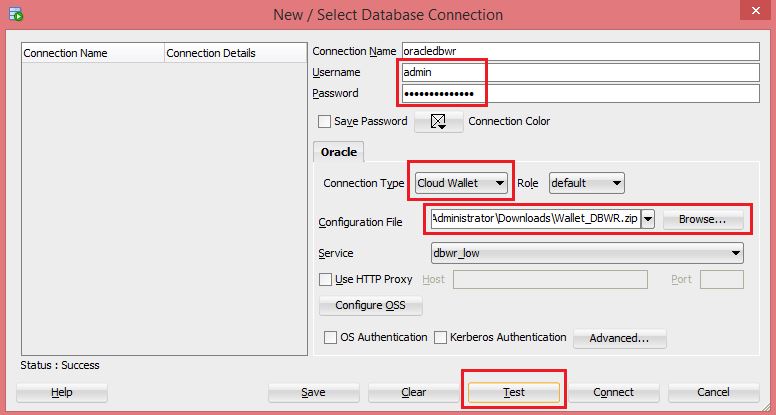
Connection Type – Select Cloud Wallet.
Configuration File – Click Browse, and select the path to your local copy of the Client Credentials zip file, downloaded from the Autonomous Data Warehouse service console by you, or given to you by your Autonomous Data Warehouse administrator.
Keystore Password –
If using SQL Developer 18.2.0 or newer: Starting with version 18.2.0, SQL Developer does not require that you enter a Keystore Password and does not provide the Keystore Password field.
If using a version of SQL Developer older than 18.2.0: Enter the password that was generated when you or your Autonomous Data Warehouse administrator downloaded the Client Credentials zip file from the Autonomous Data Warehouse console.
Service -In the drop-down menu, service selections are prepended with database names. Select the low, medium or high menu item for your database. These service levels map to the LOW, MEDIUM, and HIGH consumer groups, which provide different levels of performance and concurrency.
Note: Earlier versions of SQL Developer may not support this feature.

Step5:- Test the connections
Click Test.
Status: Success displays at the bottom left of the New/Select Database Connection dialog.
Click Connect.
An entry for the new connection appears under Connections
Step6:-Login to the Autonomous Data Warehouse Database

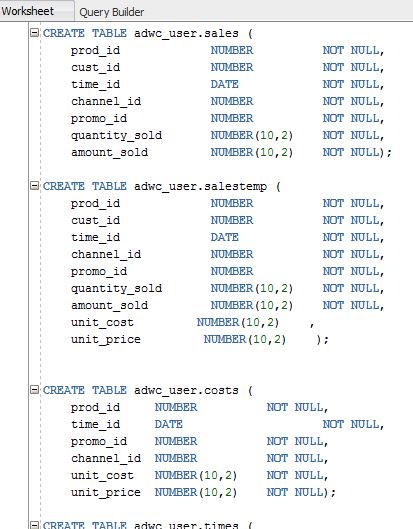
Step7:-Create SH Tables in your Autonomous Data Warehouse Database
After you have connected SQL Developer to your Autonomous Data Warehouse database, use a SQL Developer worksheet to define CREATE TABLE statements to create the SH tables (sales history tables from an Oracle sample schema) in the admin schema. In the next tutorial, you will load data into these tables from an object store.
Copy and paste sh to a SQL Developer worksheet. Run the script to create the SH tables and click Commit.
Step8:-Examine the SH Tables that you Created
Now that you have created the SH tables, take a moment to examine them. In the next tutorial, you will load data into these tables from an object store.
The SQL Developer Script Output panel shows the tables that have been created in the user named admin

Step9:-Note that the new tables also appear in the SQL Developer Connections panel.

Step10:-Examine the details of each column of the CHANNELS table.
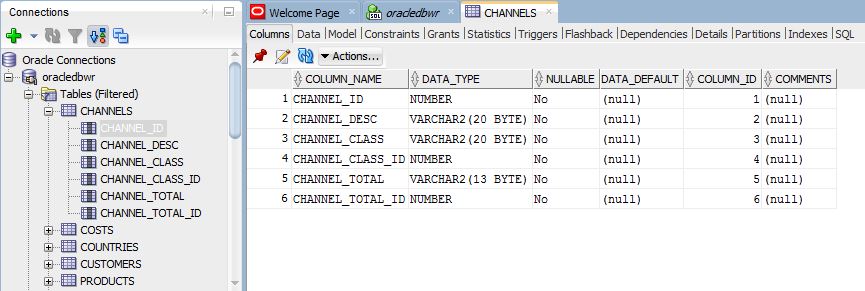
Step11:-Click the Data tab of the CHANNELS table. Note that so far, you have defined tables, but these tables are not yet populated with Data.

Reference:-
Catch Me On:- Hariprasath Rajaram

Telegram:https://t.me/joinchat/I_f4DhGF_Zifr9YZvvMkRg
LinkedIn:https://www.linkedin.com/in/hari-prasath-aa65bb19/
Facebook:https://www.facebook.com/HariPrasathdba
FB Group:https://www.facebook.com/groups/894402327369506/
FB Page: https://www.facebook.com/dbahariprasath/?
Twitter: https://twitter.com/hariprasathdba