Description:-
In this article we are going to see step by step Attaching a Block Volume for oracle cloud infrastructure instance.
Click Here creating Block volume Demo :- Oracle Gen2 Cloud-Expanding an Instances Storage
Overview:-
The Oracle Cloud Infrastructure Block Volume service lets you dynamically provision and manage block storage volumes . You can create, attach, connect and move volumes as needed to meet your storage and application requirements. Once attached and connected to an instance, you can use a volume like a regular hard drive. Volumes can also be disconnected and attached to another instance without the loss of data.
Let’s start demo:-
We are going to attach the block volume for the below VM instance.
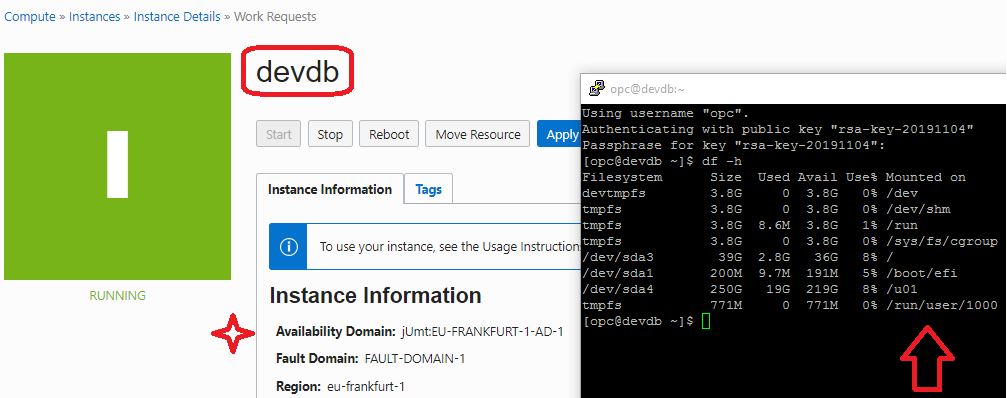
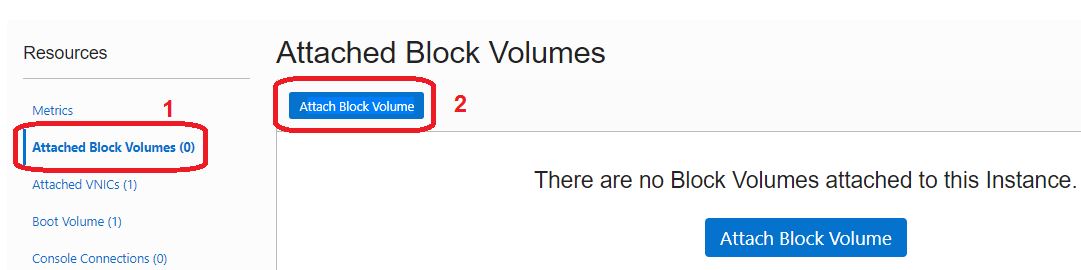
Step:-1 Go to the Compute instance Menu, and navigate to the VM instance you created before and click on the Attach Block Volume button.
Compute Instances -> Instance Details -> click Devdb -> Next click Attached block Volumes
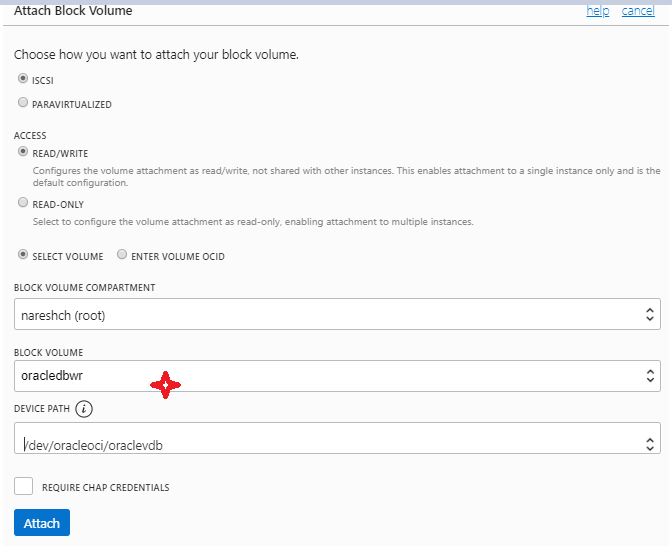
Step:-2 Select the volume created from the drop down menu and choose the following options
When you attach a block volume to a VM instance, you have two options for attachment type, iSCSI or paravirtualized.
iSCSI: iSCSI attachments are the only option when connecting block volumes to bare metal instances. Once the volume is attached, you need to log in to the instance and use the iscsiadm command-line tool to configure the iSCSI connection
Paravirtualized Paravirtualized attachments are now an option when attaching volumes to VM instances. For VM instances launched from Oracle-Provided Images, you can select this option for Linux-based images published. Once you attach a volume using the paravirtualized attachment type, it is ready to use, you do not need to run any additional commands. However, due to the overhead of virtualization, this reduces the maximum IOPS performance for larger block volumes
- Attachement mode: iSCSI
- Block Volume: Select the volume created
- Device Path: Select /dev/oracleoci/oraclevdb
- Cick Attach
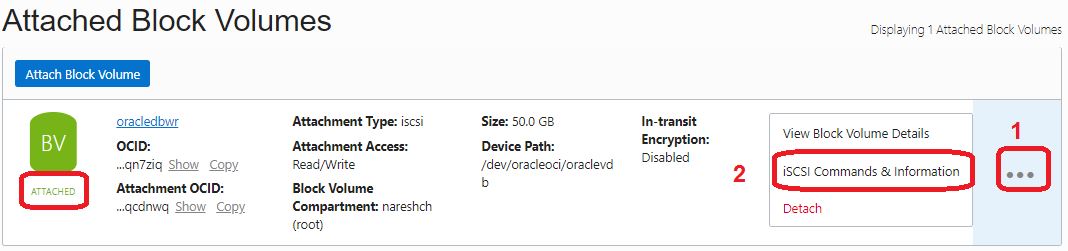
Step:-3 Once the volume is attached, you can click on the ellipsis and then click iSCSI Command and Information link.
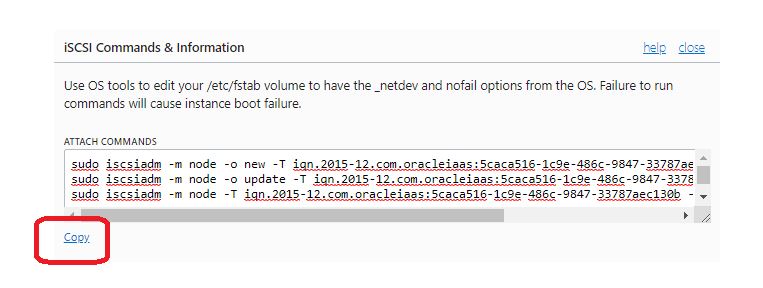
Step:-4 Connect to the instance through SSH and run the iSCSI ATTACH COMMANDS.Click on COPY to copy all attach commands run all these commands by pasting it in the terminal

Step:-5 Once the disk is attached, you can run the following commands to format the disk and mount it.
[opc@devdb ~]$ sudo su – root
[root@devdb ~]# ls -l /dev/oracleoci/oraclevd*
lrwxrwxrwx. 1 root root 6 Nov 19 19:42 /dev/oracleoci/oraclevda -> ../sda
lrwxrwxrwx. 1 root root 7 Nov 19 19:42 /dev/oracleoci/oraclevda1 -> ../sda1
lrwxrwxrwx. 1 root root 7 Nov 19 19:42 /dev/oracleoci/oraclevda2 -> ../sda2
lrwxrwxrwx. 1 root root 7 Nov 19 19:42 /dev/oracleoci/oraclevda3 -> ../sda3
lrwxrwxrwx. 1 root root 7 Nov 19 19:42 /dev/oracleoci/oraclevda4 -> ../sda4
lrwxrwxrwx. 1 root root 6 Nov 19 20:08 /dev/oracleoci/oraclevdb -> ../sdb
[root@devdb ~]# sudo mkfs -t ext4 /dev/oracleoci/oraclevdb
mke2fs 1.42.9 (28-Dec-2013)
/dev/oracleoci/oraclevdb is entire device, not just one partition!
Proceed anyway? (y,n) y
Filesystem label=
OS type: Linux
Block size=4096 (log=2)
Fragment size=4096 (log=2)
Stride=0 blocks, Stripe width=256 blocks
3276800 inodes, 13107200 blocks
655360 blocks (5.00%) reserved for the super user
First data block=0
Maximum filesystem blocks=2162163712
400 block groups
32768 blocks per group, 32768 fragments per group
8192 inodes per group
Superblock backups stored on blocks:
32768, 98304, 163840, 229376, 294912, 819200, 884736, 1605632, 2654208,
4096000, 7962624, 11239424
Allocating group tables: done
Writing inode tables: done
Creating journal (32768 blocks): done
Writing superblocks and filesystem accounting information: done
[root@devdb ~]# sudo mkdir /backup
[root@devdb ~]# sudo mount /dev/oracleoci/oraclevdb /backup

Successfully attached the block volume to VM instance
When mounting a storage volume for the first time, you can format the storage volume and create a single, primary partition that occupies the entire volume by using fdisk command (Caution: Using fdisk to format the disk deletes any data on the disk).
Like Below:-
[root@dbwroem ~]# fdisk /dev/sdb
Welcome to fdisk (util-linux 2.23.2).
Changes will remain in memory only, until you decide to write them.
Be careful before using the write command.
Device does not contain a recognized partition table
Building a new DOS disklabel with disk identifier 0x267ed713.
The device presents a logical sector size that is smaller than
the physical sector size. Aligning to a physical sector (or optimal
I/O) size boundary is recommended, or performance may be impacted.
Command (m for help): n
Partition type:
p primary (0 primary, 0 extended, 4 free)
e extended
Select (default p): p
Partition number (1-4, default 1): 1
First sector (2048-209715199, default 2048):
Using default value 2048
Last sector, +sectors or +size{K,M,G} (2048-209715199, default 209715199):
Using default value 209715199
Partition 1 of type Linux and of size 100 GiB is set
Command (m for help): w
The partition table has been altered!
Calling ioctl() to re-read partition table.
Syncing disks.
Step:-6 Enter the value in fstab and mount the disk
[root@devdb ~]# blkid
/dev/sda1: SEC_TYPE=”msdos” UUID=”4EAE-E92C” TYPE=”vfat” PARTLABEL=”EFI System Partition” PARTUUID=”4c374dd7-f879-407c-ac2e-0154e586c082″
/dev/sda2: UUID=”ec49f02f-cbd9-4890-88d3-fee99c70e661″ TYPE=”swap” PARTUUID=”d023a973-8ef5-4526-b793-f6756fa6a3c6″
/dev/sda3: UUID=”915fbdd1-9aba-4b6d-8714-5c28f1c31d77″ TYPE=”xfs” PARTUUID=”e0fedb5c-f09f-4a3f-9d75-c68f6b86e30a”
/dev/sda4: LABEL=”/u01″ UUID=”97eb0fdf-ebb0-4018-8674-a3df7d59b60b” TYPE=”ext4″ PARTLABEL=”primary” PARTUUID=”41f04a02-8f46-4bd5-924e-e1d84b050ae4″
/dev/sdb: UUID=”7836ebdc-135d-4a4c-9840-a48b5257b8d6” TYPE=”ext4″
Open /etc/fstab file enter the below line
UUID=7836ebdc-135d-4a4c-9840-a48b5257b8d6 /backup ext4 defaults,noatime,_netdev 0 2
[root@devdb ~]# cat /etc/fstab
#
# /etc/fstab
# Created by anaconda on Thu Aug 15 02:35:23 2019
#
# Accessible filesystems, by reference, are maintained under ‘/dev/disk’
# See man pages fstab(5), findfs(8), mount(8) and/or blkid(8) for more info
#
UUID=915fbdd1-9aba-4b6d-8714-5c28f1c31d77 / xfs defaults,_netdev,_netdev 0 0
UUID=4EAE-E92C /boot/efi vfat defaults,uid=0,gid=0,umask=0077,shortname=winnt,_netdev,_netdev,x-initrd.mount 0 0
UUID=ec49f02f-cbd9-4890-88d3-fee99c70e661 swap swap defaults,_netdev,x-initrd.mount 0 0
######################################
## ORACLE CLOUD INFRASTRUCTURE CUSTOMERS
##
## If you are adding an iSCSI remote block volume to this file you MUST
## include the ‘_netdev’ mount option or your instance will become
## unavailable after the next reboot.
## SCSI device names are not stable across reboots; please use the device UUID instead of /dev path.
##
## Example:
## UUID=”94c5aade-8bb1-4d55-ad0c-388bb8aa716a” /data1 xfs defaults,noatime,_netdev 0 2
##
## More information:
## https://docs.us-phoenix-1.oraclecloud.com/Content/Block/Tasks/connectingtoavolume.htm
LABEL=”/u01″ /u01 auto defaults,_netdev 0 0
UUID=7836ebdc-135d-4a4c-9840-a48b5257b8d6 /backup ext4 defaults,noatime,_netdev 0 2
Connect with me:-
Telegram App:https://t.me/oracledbwr
LinkedIn:https://www.linkedin.com/in/hariprasathdba
Facebook:https://www.facebook.com/HariPrasathdba
FB Group:https://www.facebook.com/groups/894402327369506/
FB Page : https://www.facebook.com/dbahariprasath/?
Twitter : https://twitter.com/hariprasathdba